SCGI on IIS 5.1 and 6
This describes installation for IIS 5.1 and 6. Installation for IIS 7 is described elsewhere.
The Simple Common Gateway Interface (SCGI) is a standard for communication between web servers and application servers on the back end. It has several performance advantages over CGI. This chapter describes configuring IIS 5.1 and 6 to use SCGI to communicate with a Woof! application server on the back end. The process of running Woof! as a SCGI application server is described in the chapter Running as an SCGI server.
SCGI support is not a standard part of IIS and you need to install the isapi_scgi IIS extension to support it. You will also optionally need to install a URL rewriting filter. Both procedures are described below.
Assumptions
This scenario makes the following assumptions:
- You have full control over IIS configuration.
- The server hosts the Woof! application alongside other applications.
- The application is rooted at /myapp, i.e. http://www.mysite.com/myapp is the entry point into the application.
- You have the means to modify the system configuration so that the Woof! SCGI server is started automatically either at boot time or when IIS is started.
Step 1 - install Woof!
Install Woof! for IIS and SCGI using using the installer script.
~/woof-dist> tclsh scripts/installer.tcl install iis scgi -installdir /myappdir
This will create the Woof! directory structure under /myappdir. In particular, the /myappdir/public will contain the publically accessible directory tree that will be the document root for the Woof! application.
Since the Woof! application is not rooted at / we also need to tell Woof! the application root URI, /myapp in our case. For this purpose, we add the line below to the Woof! application configuration file, which in our example will reside at /myappdir/config/application.cfg.
set url_root /myapp
This will allow Woof! to correctly decode and generate URL's for the Woof! application.
Step 2 - install isapi_scgi
The isapi_scgi IIS extension for SCGI is open source
software that can be freely downloaded and used. A sample installation
is shown below. The isapi_scgi
web
site contains detailed download, installation and usage
instructions.
Download the extension from the isapi_scgi
download
area. Extract the isapi_scgi.dll
file from the downloaded archive and place it in
the public folder of your Woof!
installation (/myapp/public in our
example).
Step 3 - configure the application in IIS
The sample session below illustrates installation under IIS 5.1 on Windows XP. Installation under IIS 6 will be similar. The session shown configures IIS such that the extension will be accessed under the URL /myapp/isapi_scgi.dll/. All requests to URLs below this will be passed by the extension to the SCGI server. In a later step, we will configure a IIS URL rewriter to hide the use of the DLL so requests under /myapp will be passed to the SCGI server.
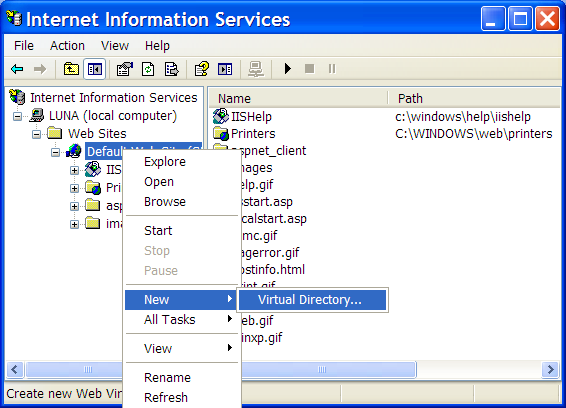
Start up the MMC IIS manager and create a new virtual directory, myapp, under the default Web site as shown in the screen shot below.
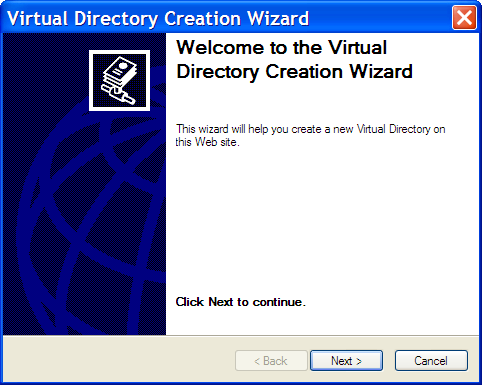
This will bring up the MMC wizard. Click on the Next button after filling the fields in each wizard screen as shown in the sequence below.
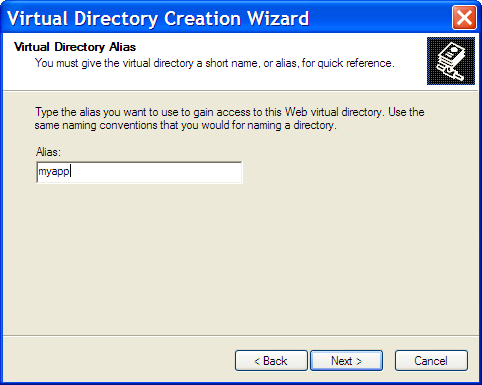
When prompted for the alias,
type myapp. This is the URL root
under which we want the Woof! application to be accessed and must be
the same as the value of the url_root Woof! configuration
variable we used in Step 1 except for leaving out the leading
slash.
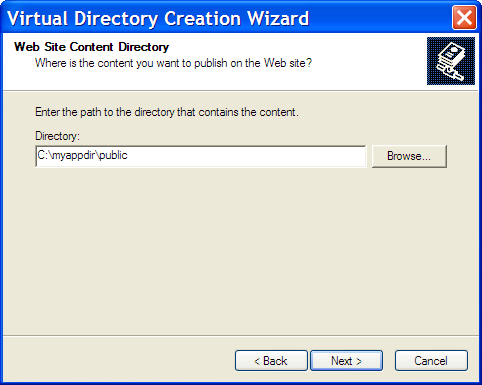
The next screen prompts for the location of the physical directory for the application. Here we enter the path to the public subdirectory under our Woof! installation.
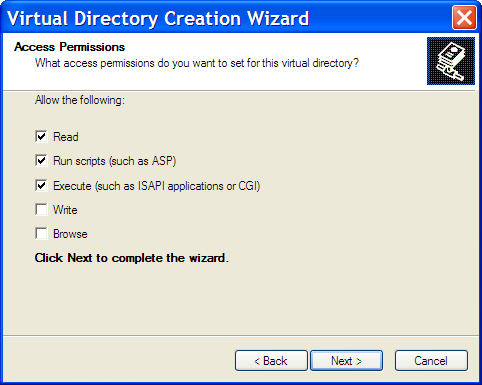
When configuring directory permissions, we must select the Execute check box as shown below as isapi_scgi.dll is a ISAPI extension and requires this permission to run.
Finally, click Finish to complete the wizard.
After finishing the wizard, right click on the newly created myapp virtual directory and configure its properties as shown below.

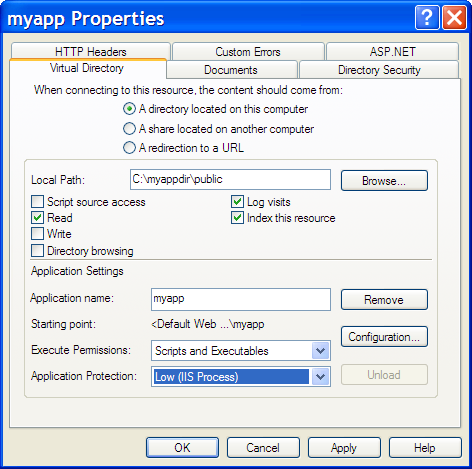
As shown in the Properties page, as entered in the
wizard, the myapp virtual directory
is mapped to our physical publically accessible
directory, /myappdir/public and
the Execute Permissions setting allows executables to
run. The only change we make is setting the Application
Protection value to Low instead
of Medium for higher performance.
Step 4 - configure SCGI
If you are not running the default SCGI server address and port,
follow the steps described in
the isapi_scgi configuration manual
to set up isapi_scgi options. This step is not
required if you are running the default SCGI configuration.
Step 5 - configure URL rewriting
This step is optional but is usually desirable for various reasons. The configuration steps described so far will result in the Woof! SCGI server being invoked for URL's starting with http://www.mysite.com/myapp/isapi_scgi.dll. A URL rewrite filter will allow this root URL to be changed to http://www.mysite.com/myapp instead. This step is optional but is recommended for all the reasons listed in Added Bytes or Wikipedia. If you choose to skip this step, you must also change value of url_root in Step 1 to /myapp/isapi_scgi.dll as that will be root URL for Woof! without URL rewriting.
There are several URL rewriting solutions, both free and commercial, available for IIS. This manual describes the use of the free Ionics Isapi Rewrite Filter (IIRF) V1.2.16 (not V2.x since that is not supported for IIS 5.1). Procedures for other versions may differ. Use of IIRF 2.x is described in the IIS 7 section.
Follow Ionics' excellent installation instructions to install IIRF. Then add the following lines to the IIRF configuration file IsapiRewrite4.ini in the IIRF directory.
RewriteRule ^/myapp/images/(.*)$     /myapp/images/$1 [L]
RewriteRule ^/myapp/stylesheets/(.*)$     /myapp/stylesheets/$1 [L]

RewriteCond %{REQUEST_FILENAME}     !-f
RewriteRule ^/myapp(.*)$            /myapp/isapi_scgi.dll$1 [U,L]
The first two lines ensure no rewriting is done for images and stylesheets in the public directory that we want directly served by IIS. The remaining lines rewrite URL's for which there is actual existing file to isapi_scgi.dll which will then pass the request on to the Woof! SCGI server.
For performance reasons, once you have verified correct IIRF operation, you may also want to add the following line to IsapiRewrite4.ini to reduce overhead by turning off logging in IIRF.
RewriteLogLevel 0
Step 6 - starting the SCGI server
The Woof! SCGI server script that handles connections passed by Apache needs to be started whenever Apache runs. This step is actually independent of the web server and is described in Running as an SCGI server.
Completing the installation
Once the steps described there are done, configuration is complete. You can now move on to completing the installation.